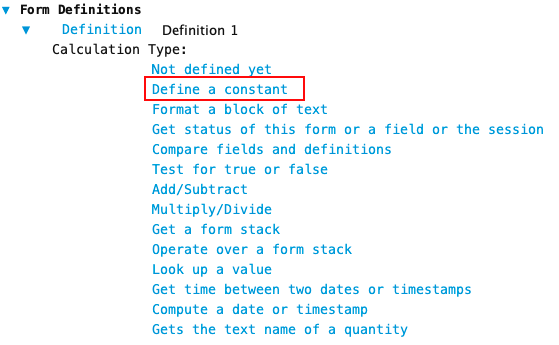
Use this calculation type to create a constant definition on a master form. A constant is a value that does not change. For example, Sales Tax Rate, Retail Mark-up, Revenue GL Account Code.
A constant defined in a master form is accessible by all data forms of that master form type. For example, a Default Mark-up constant defined in a Sales Invoice master form is accessible by all Sales Invoice data forms. It would also be accessible to any forms with a reference to Sales Invoice.
A constant defined in the Organization master form is accessible by all data forms in the system.
To create a character string constant use the "Format a Block of Text" calculation type.
Quantity Constant
A constant value can be defined for all the quantity types: Units, Currency, Rate, Exchange Rate. For example, VAT of 5%, NSF Charge of $20, Base Labour Rate of $15/hour. See also The Meaning of Quantity for full details about Quantities. Note: Exchange Rate is only available for multi-currency systems.
Form Constant
A form constant is a entity code value for a data form of a chosen entity type. For example, the GL Account for the AP control account.
Form constants for transaction forms cannot be defined.
Named Data Part Constant
A named data part constant holds the value for one part of multi-part entity form code or pattern text. For example, in a two part GL Account code for entity forms with a branch number part (12450-010) a constant could be defined for the head office branch number.
Configuration
These are the basic steps to configure this calculation type. Formever will lead you through as you point and click.
Label the definition
Select the type of constant
Specify the constant value and associated attributes depending on the type of constant
'Define a Constant' in the list of calculation types
Step 1 - Label Definition
Give the definition a descriptive label. This doesn’t have to be done first. But make sure you provide a descriptive label before filing the master form. Since definitions are used throughout the system a descriptive label is recommended.
Doing it first serves as a reminder of what you are trying to accomplish as you configure the definition.
After naming definition and selecting Define a Constant calculation type
Step 2 - Select type of constant
Begin by selecting the type of constant you want to create. Change the type of constant by clicking on the blue text to the right of the label ‘Constant is a’. Each click will cycle through the different choices.
Choose the quantity type by clicking text beside the text ‘Quantity type:". As click it will cycle through the choices.
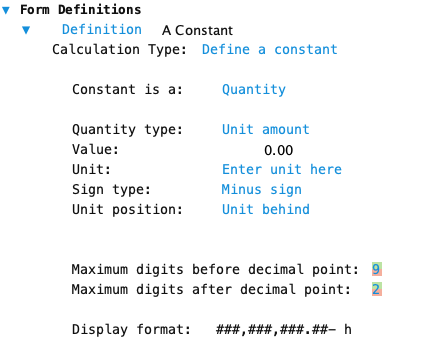
Quantity Constant - Unit Type
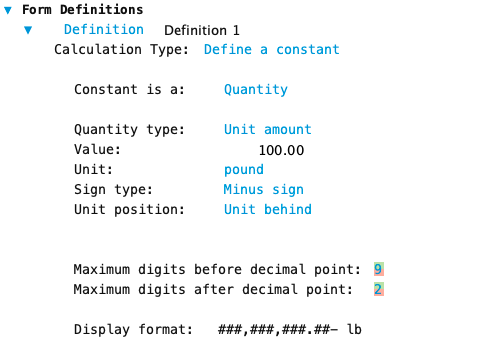
Before specifying the value of a quantity constant it is best to specify the units of the quantity. By default quantity constant units are in the home currency of the system.
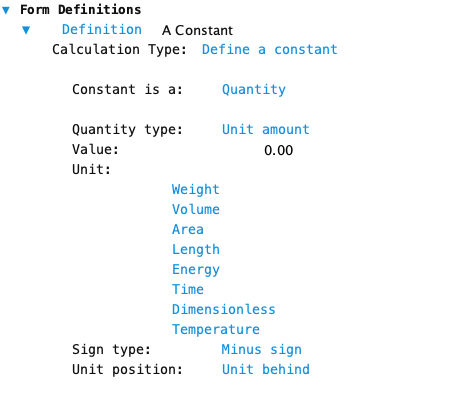
Formever has a huge number of unit types from which to choose. To change the units click on the text ‘Enter unit here’ to the right of the ‘Unit:’ text. View all supported units at Formever Units
Unit Amount Type Quantity Constant Showing Available Types of Units
After specifying the unit type, enter the value for the constant. Click on the digits to the right of the ‘Value:’ text.
Pounds as Unit and Value of 100 - Note Proper Units shown in Display Format
Sign Type: Click to select the sign type for the quantity constant. Sign type is only used to display the sign – it does not affect the sign of the actual quantity.
Sign type choices:
No Sign
Minus Sign
Cr/Db with zero being a Credit
Db/Cr with zero being a Debit
Parentheses ()
Unit Position: Specifies where the unit symbol is shown relative to the unit value. For example, currency symbols might be shown preceding the amount while weight symbols are shown following the amount. Click on the current choice to change. Choices are: in front, behind, no unit. A preceding unit position is located at the extreme left of the value and is fixed. It doesn’t not move depending on the number of digits in the amount.
Maximum Digits before decimal point: Set the number of digits to allow preceding the decimal point. Adjust by clicking the green portion of each digit to increase and the red portion to decrease.
Maximum Digits after decimal point: Set the number of digits to allow following the decimal point. Adjust by clicking the green portion of each digit to increase and the red portion to decrease.
Display Format: Shows the resulting format of the quantity constant as you configure it.
Quantity Constant - Rate Type
Before specifying the value of a rate constant it is best to specify the currency and units of the rate. By default rate constant are in the home currency of the system. If you have a multi-currency system then you can change the currency of the rate by clicking on the currency symbol.
Formever has a huge number of unit types from which to choose. To change the units click on the text ‘Change unit’ to the right of the ‘Currrency/unit:’ text. View all supported units at Formever Units
Rate Type Quantity Constant - Showing Dollars/Hour Rate
After specifying the rate type, enter the value for the rate constant. Click on the digits to the right of the ‘Value:’ text.
Sign Type: Click to select the sign type for the quantity constant. Sign type is only used to display the sign – it does not affect the sign of the actual quantity.
Sign type choices:
No Sign
Minus Sign
Cr/Db with zero being a Credit
Db/Cr with zero being a Debit
Parentheses ()
Unit Position: Specifies where the unit symbol is shown relative to the unit value. For example, currency symbols might be shown preceding the amount while weight symbols are shown following the amount. Click on the current choice to change. Choices are: in front, behind, no unit. A preceding unit position is located at the extreme left of the value and is fixed. It doesn’t not move depending on the number of digits in the amount.
Maximum Digits before decimal point: Set the number of digits to allow preceding the decimal point. Adjust by clicking the green portion of each digit to increase and the red portion to decrease.
Maximum Digits after decimal point: Set the number of digits to allow following the decimal point. Adjust by clicking the green portion of each digit to increase and the red portion to decrease.
Display Format: Shows the resulting format of the quantity constant as you configure it.
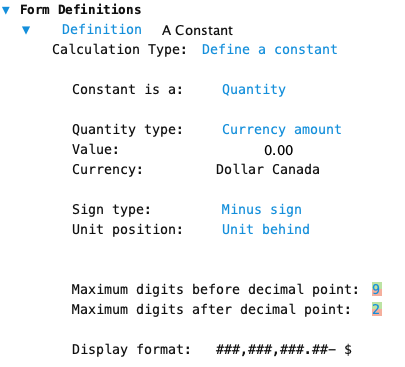
Quantity Constant - Currency Type
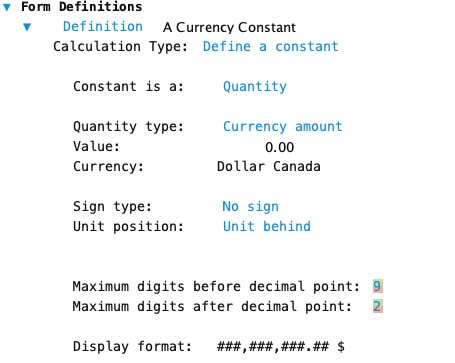
On single currency systems a currency quantity constant is in the home currency of the system.
If you have a multi-currency system change the currency of the quantity constant by clicking on the text to the right of "Currency:".
Currency Type Quantity Constant - Single Currency System
Currency Type Quantity Constant On Multi-currency System
After specifying the currency, enter the value for the currency quantity constant. Click on the digits to the right of the ‘Value:’ text.
Currency: On multi-currency systems, click to select the currency of the quantity constant. On single currency systems the currency defaults to the system home currency.
Sign Type: Click to select the sign type for the quantity constant. Sign type is only used to display the sign – it does not affect the sign of the actual quantity.
Sign type choices:
No Sign
Minus Sign
Cr/Db with zero being a Credit
Db/Cr with zero being a Debit
Parentheses ()
Unit Position: Specifies where the unit symbol is shown relative to the unit value. For example, currency symbols might be shown preceding the amount while weight symbols are shown following the amount. Click on the current choice to change. Choices are: in front, behind, no unit. A preceding unit position is located at the extreme left of the value and is fixed. It doesn’t not move depending on the number of digits in the amount.
Maximum Digits before decimal point: Set the number of digits to allow preceding the decimal point. Adjust by clicking the green portion of each digit to increase and the red portion to decrease.
Maximum Digits after decimal point: Set the number of digits to allow following the decimal point. Adjust by clicking the green portion of each digit to increase and the red portion to decrease.
Display Format: Shows the resulting format of the quantity constant as you configure it.
Quantity Constant - Exchange Rate Type
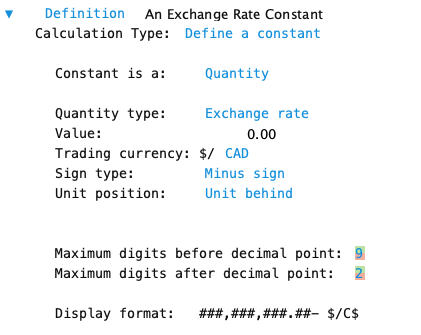
Note: The Exchange Rate Quantity type constant is only offered when a system has multiple currencies.
Before specifying the value of a currency exchange rate constant it is best to specify the trading currency of the rate. Click on the currency symbol to display a list of trading currencies in use in the system.
Exchange Rate Type Quantity Constant - Showing Home Currency/Trading Currency Rate
After specifying the exchange rate trading currency, enter the value for the exchange rate constant. Click on the digits to the right of the ‘Value:’ text.
Sign Type: Click to select the sign type for the quantity constant. Sign type is only used to display the sign – it does not affect the sign of the actual quantity.
Sign type choices:
No Sign
Minus Sign
Cr/Db with zero being a Credit
Db/Cr with zero being a Debit
Parentheses ()
Unit Position: Specifies where the unit symbol is shown relative to the unit value. For example, currency symbols might be shown preceding the amount while weight symbols are shown following the amount. Click on the current choice to change. Choices are: in front, behind, no unit. A preceding unit position is located at the extreme left of the value and is fixed. It doesn’t not move depending on the number of digits in the amount.
Maximum Digits before decimal point: Set the number of digits to allow preceding the decimal point. Adjust by clicking the green portion of each digit to increase and the red portion to decrease.
Maximum Digits after decimal point: Set the number of digits to allow following the decimal point. Adjust by clicking the green portion of each digit to increase and the red portion to decrease.
Display Format: Shows the resulting format of the quantity constant as you configure it.
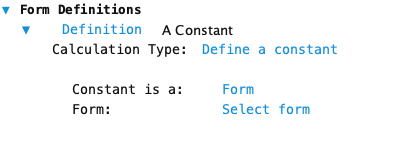
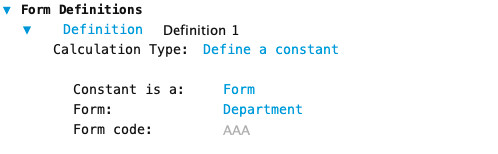
Form Constant
A Form constant is an entity code value for a specific data form. An example, is using constants for certain GL Accounts such as BANK, A/R Control.
The first step is to select the form type. Click on the text ‘Select form’ to open a list of all master forms in the system. Currently, both entity and transaction forms are listed. But, oOnly entity form can be used. Click on the desired entity form.
Form Constant - Use This Constant Type to Specify an Entity Code Constant
After selecting the form type enter the form code value of the desired data form. Enter the value to the right of the text ‘Form code:’. This must be the form code of a data form that has been filed, or will be filed before the constant is used.
The system does not currently check if the form code value entered is for an existing entity data form. This is not necessarily bad. During system development you define form constants before any data is in the system. You can import test data to test the system and then revert to a restore point prior to import of data but when form constants were defined – saving you from having to recreate them.
After Choosing Form Type - Ready for Form Code Value
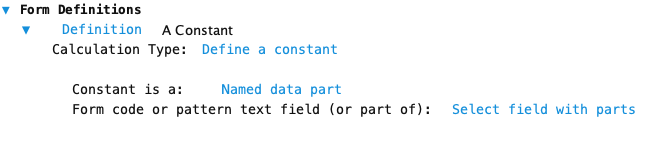
Named Data Part Constant
Named data part constants are seldom used.
Use this type to create a constant for one part of a multi-part code field or multi-part pattern field. For example, a 416 area code for customer phone numbers.
Named Data Part Constant - Use this to specify an Entity Code constant value for use in a multi-part Entity Code
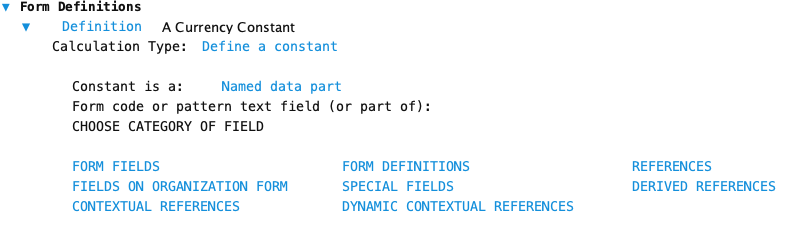
The first step is to select a code field or pattern text field. Click on the text ‘Select field with parts’ to open the field chooser to show the field categories. Navigate through to find the desired field. See also Field Chooser.
Named Data Part - Showing Field Chooser Field Categories
After selecting a multi-part field choose the part of the field to specify.
Click in the part name to cycle through the parts of the field.
Named Data Part - Showing Selected Field - Cycle Through Parts
After choosing the field part, enter the value for the named data part constant. Click on the field to the right of the ‘Value:’ text.
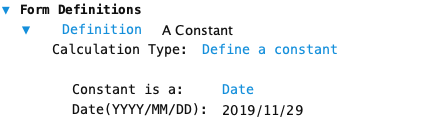
Date Constant
By default a Date constant is specified with date you created the constant.
Enter a different date value in the format shown.
The date is stored in Formever’s internal date format and is comparable to dates in any format.
Date Type Constant - Stored in Internal Date Format and Comparable to any Date