1. Home
  2. Docs
  3. Master Form
  4. Definitions
  5. Add/Subtract

Add/Subtract

Use this calculation type on a master form to create a definition result by adding/subtracting multiple quantities. For example, Invoice Total: invoice subtotal – discount + taxes.

Configuration

These are the basic steps to configure this calculation type. Formever will lead you through as you point and click.

  1. Label the definition
  2. Select the first field
  3. Select the operator on the first field
  4. Select the next field 
  5. Select the operator on the next field
  6. Specify result attributes
Multiple fields can be included in the calculation
'Add/Subtract' in the list of calculation types

Step 1 - Label Definition

Give the definition a descriptive label. This doesn’t have to be done first. But make sure you provide a descriptive label before filing the master form. Since definitions are used throughout the system a descriptive label is recommended.

Doing it first serves as a reminder of what you are trying to accomplish as you configure the definition. 

Step 2 - Select the First Field

Select the field or definition to include in the calculation. Click on the ‘Select a field item’ text and the field chooser will open.

Select the first field by Opening field Chooser
Opened Field Chooser Will Only Offer Quantity Fields That Can Be Added or Subtracted
After selecting first quantity field to add - Note PLUS operation

Step 3 - Select the Operation to perform

Click on the blue text beside the "Field:" label to toggle between ‘PLUS’ or ‘MINUS’ operators. The default operator is ‘PLUS’.

Step 4 - Select the Next Field

Insert another field to include in the calculation. Click the "plus-down" or "plus-up" edit control to the right of the exiting item. Then choose the field to use.

Adding/Deleting/Moving Test Items

The edit controls for test items are located to the far right of each test item. 

Click the "plus-up/down arrow" edit control to add a new item test above or below the current item test.

Click the "up/down arrow" edit control to shift a item test up or down.

Click the "X" edit control to delete the item test.  The first test item not be deleted if it is the only one in the list. 

After creating another step in the calculation
After selecting next quantity field to add

Step 5 - Select the Operation to perform

Click on the blue text beside the "Field:" label to toggle between ‘PLUS’ or ‘MINUS’ operators. The default operator is ‘PLUS’.

This creates a definition called Total Invoice which is defined as adding the Invoice Sub-Total quantity and adding the Total Taxes quantity. The final step is to specify the attributes of the result.

Step 6 - Specify Result Attributes

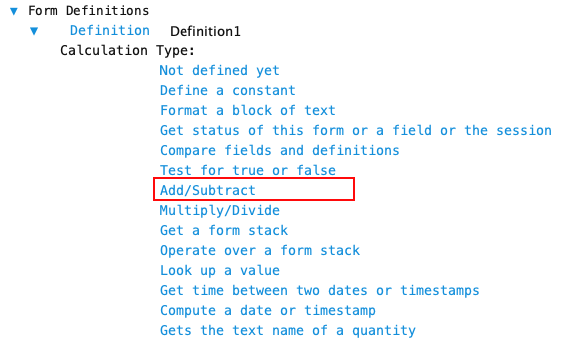
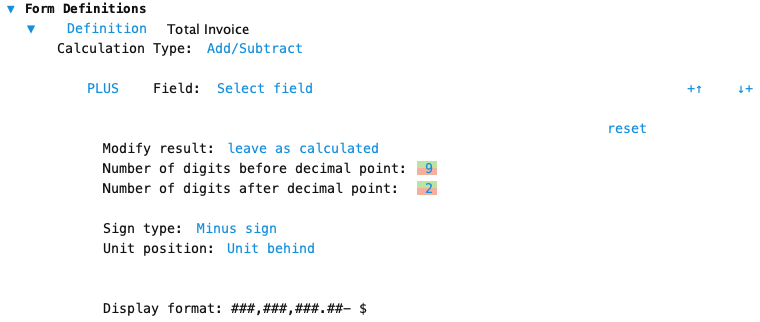
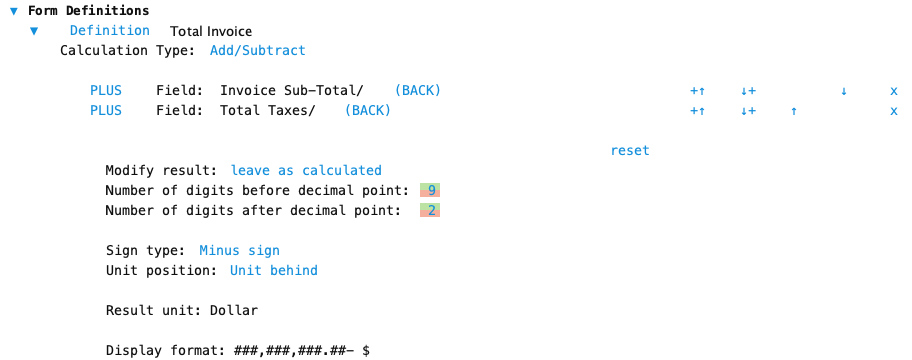
Below the fields in the calculation are various result attributes that can be specified. Result attributes are those used if the result is displayed in its default format. The default attributes are shown in the image above. The resulting display format is shown at the very bottom of the  definition.

Modify Results: Indicate if the result value or result sign should be modified. The most frequent use for these is in financial reports. 

Result modification choices:

  • Leave as calculated
  • Force to zero if negative
  • Force to zero if positive
  • Force to positive
  • Force to negative
  • Reverse sign

Number of Digits before decimal point: Set the number of digits to allow in the field before the decimal point. Adjust by clicking the green portion of each digit to increase and the red portion to decrease.

Number of Digits after decimal point: Set the number of digits to allow in the field after the decimal point. Adjust by clicking the green portion of each digit to increase and the red portion to decrease.

Sign Type: Click to select the sign type for the result. Sign type is only used to display the sign – it does not affect the sign of the actual quantity. 

Sign type choices:

  • None
  • Minus Sign
  • Cr/Db with zero being a Credit
  • Db/Cr with zero being a Debit
  • Parentheses ()

Unit Position: Indicate where the unit symbol should be positioned when the result quantity is displayed. 

  • Unit behind amount
  • Unit in front (fixed position far left ) of amount
  • No unit sign

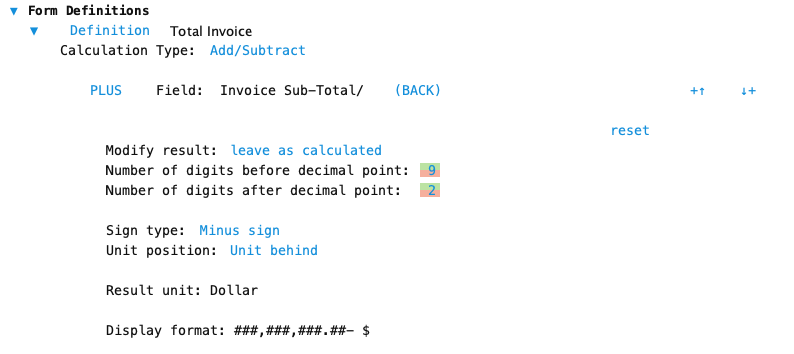
Result Unit: Indicates the unit type of the result quantity when it is displayed. The default result unit is based upon the fields used in the calculation. Depending on the result unit it can be changed to other related units. For example, if the default result unit is hours, this can be changed to minutes, seconds, days etc.

How can we help?