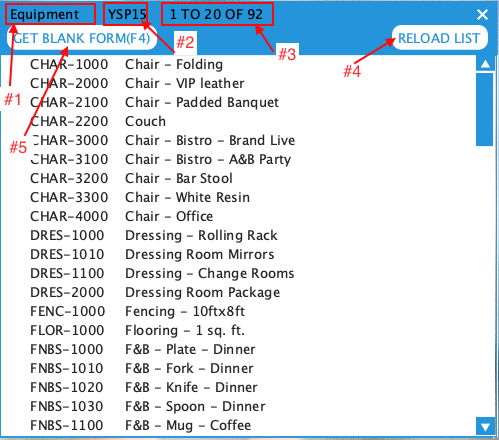
The Selection List is a scrollable list of data forms. It is a way to navigate and access the data forms in the system. Each master form has at least one selection list. There can be multiple selection lists for a data form type. Selection lists can present entire data sets (e.g. all Customers) or filtered/sorted data (e.g. Customers with invoices over 60 days sorted by unpaid balance)
Like other desktop widgets open a closed selection list by either double-clicking or selecting it and enlarging. Open a data form by clicking the row. Create new blank data forms by clicking the Get Blank Form button or pressing the F4 function key.


| # | Item | Description |
|---|---|---|
| #1 | Form Name | The name of the master form shown in the selection list. |
| #2 | Fiscal Period | The current fiscal period you are operating in. (also shown on desktop background and Formever window title bar) |
| #3 | Total and Range Displayed | The total number of data forms and range currently displayed. |
| #4 | Reload |
Refresh the list to reflect any additions/deletions of data forms made by other users on cloud systems. In cloud systems the button will turn red to indicate there has been a change. Auto-refresh is not provided to prevent the list changeing while you using it. |
| #5 | Get Blank Form Buttion | Get a blank copy of the master form ready for data entry. |
| Scroll Bar | A scrollbar will appear on the right side of an open selection list when there are more data forms than can be shown. |
Selection Lists can be stored in a desktop folder or left on the desktop. See Folders for details about adding/removing selection lists. Multiple selection lists can provide differing views on the same data form type. For example one selection list might show all customers. Another selection list might show only customers with an outstanding balance.
Opening/Closing
A selection list can be open or closed (icon form). There are two ways to open/close a selection list:
- Double click to open or close
- Zoom the size until it changes.
